How to Perform a Malware Scan on your Content
VIDIZMO provides malware scanning capabilities that allow you to check your Portal content for threats and malicious elements. With the Malware Scan application, you can perform security scans on both uploads and existing content to determine if they are infected with malware or other harmful software. Additionally, VIDIZMO allows you to view the scan details and perform several actions regarding the infected files. On the Infected Files page, you can view information related to the scan and the threat reported by the scanning provider. You can also carry out actions such as rescanning or force-publishing the infected files.
Prerequisites
- Ensure you belong to a group with the Scan/Malware feature enabled.
- To perform actions on the Infected Files page, you need to belong to a group that has the Malware Threat Control feature enabled. For more information, see Enable Features in the VIDIZMO Portal.
- To use the Malware Scan application, ensure that Azure or AWS is set as your storage provider, and VIDIZMO On-Premise Encoder is chosen as your encoding provider.
Malware Scan via Automatic Processing
When the Malware Scan app is enabled with automatic processing, it will perform a scan for all files uploaded to your Portal.
Refer to Configuring Malware Scan App in VIDIZMO for a configuration guide. Automatic processing takes place when:
- Content is uploaded.
- Content is ingested.
- A VIDIZMO Live session is saved and published.
Follow these steps to see how an automatic scan is performed for a file uploaded to your Portal.
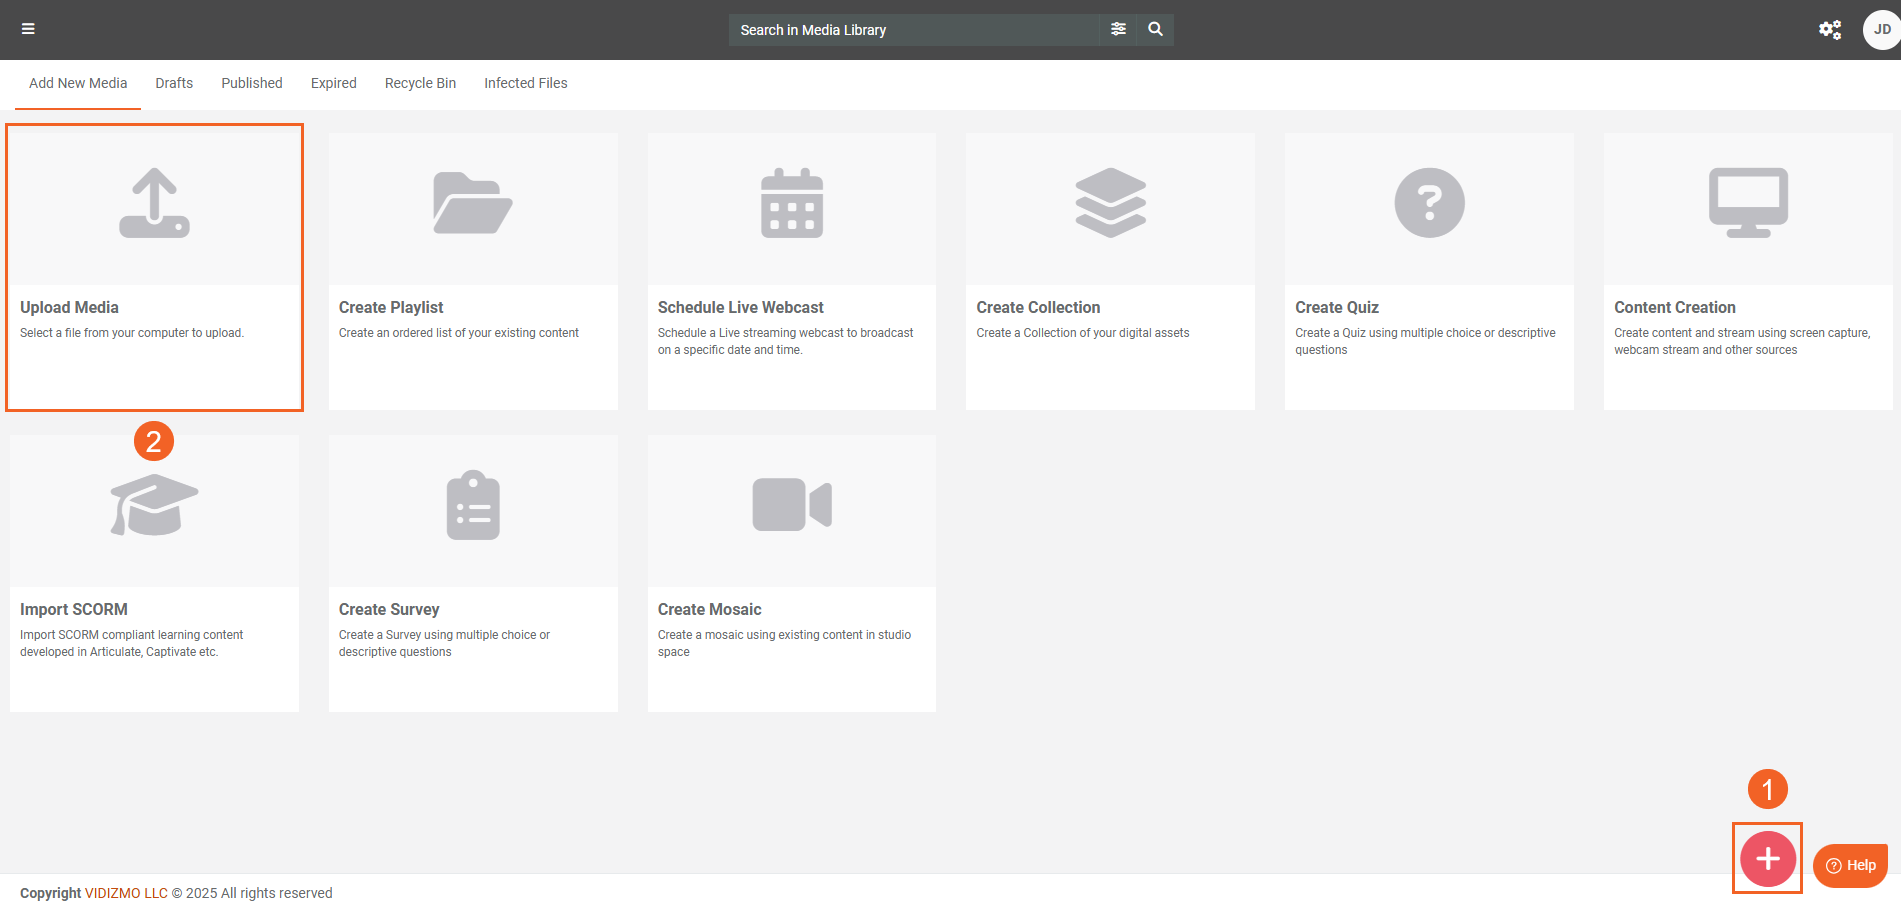
- Click the Add Media button to navigate the Add New Media page.
- Select Upload Media to upload your file.
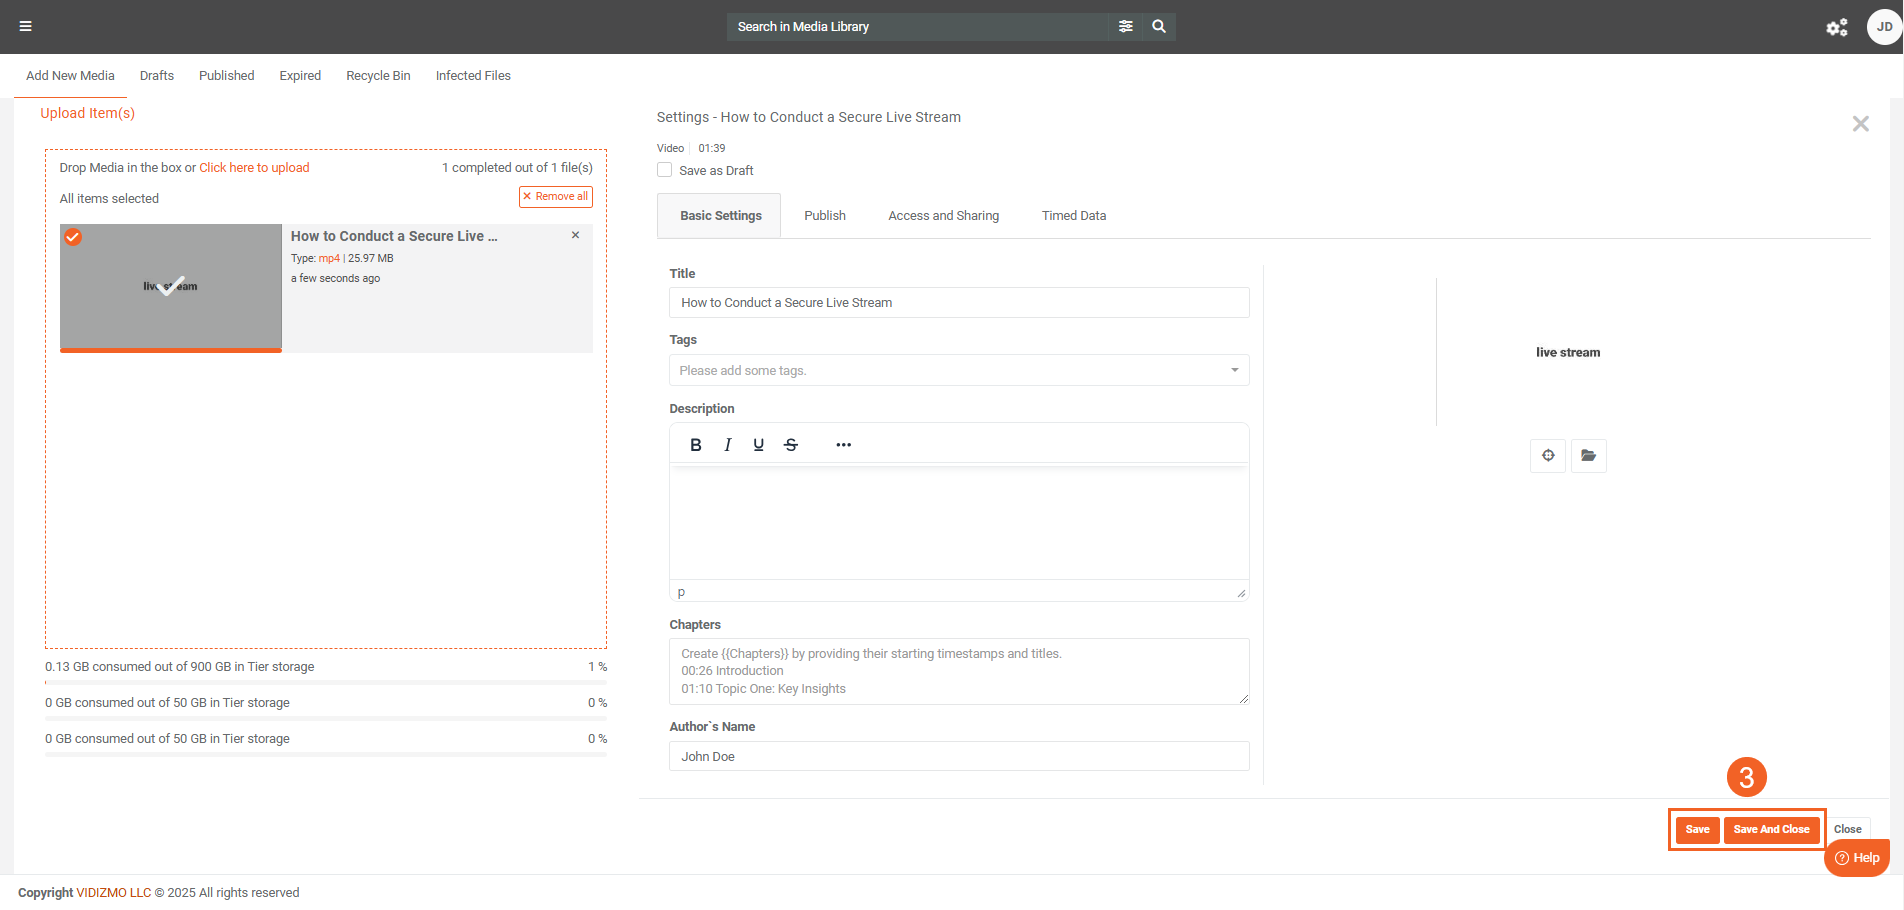
- Edit the Media Settings of your uploaded content according to your preferences, then click Save or Save and Close.
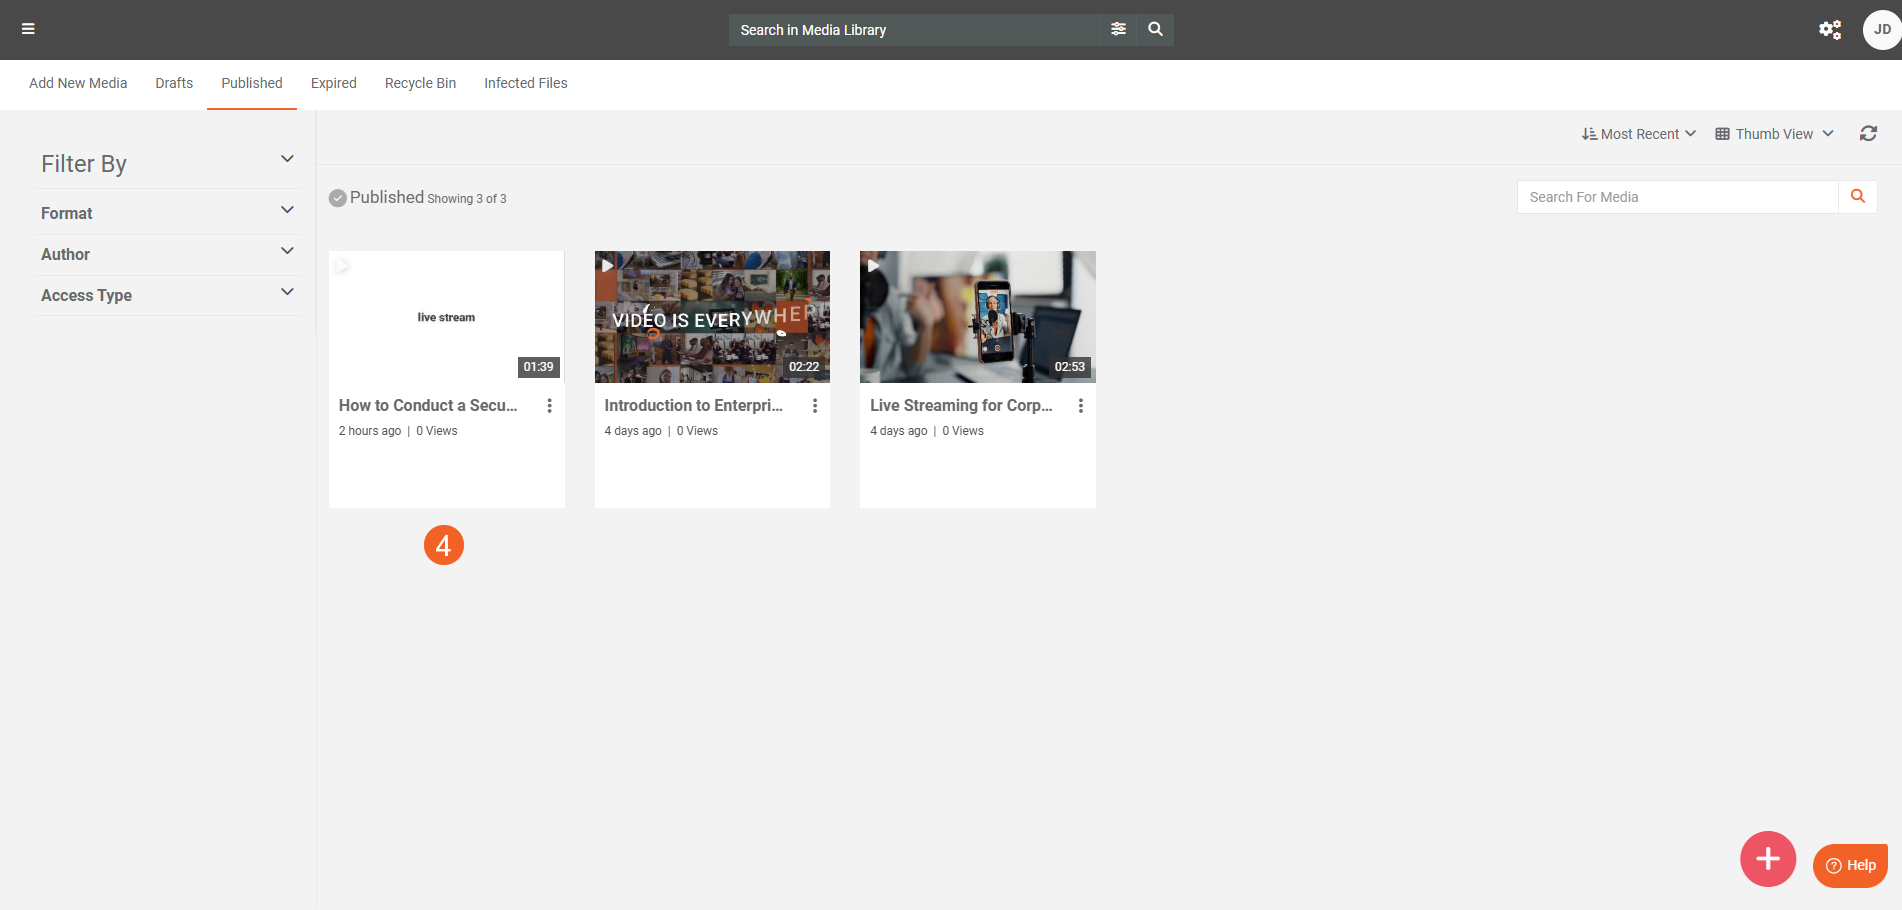
- The uploaded file then undergoes a scan. If it is clean, it shows up in your Portal library, and you can utilize it as you would normally.
- However, if a file is infected, it is quarantined away and does not go into your Portal library. The file shows up on the Infected Files page, where you can perform several actions. Refer to the section on the Infected Files page below.
Malware Scan via On-Demand Processing
On-Demand Processing via Custom Upload
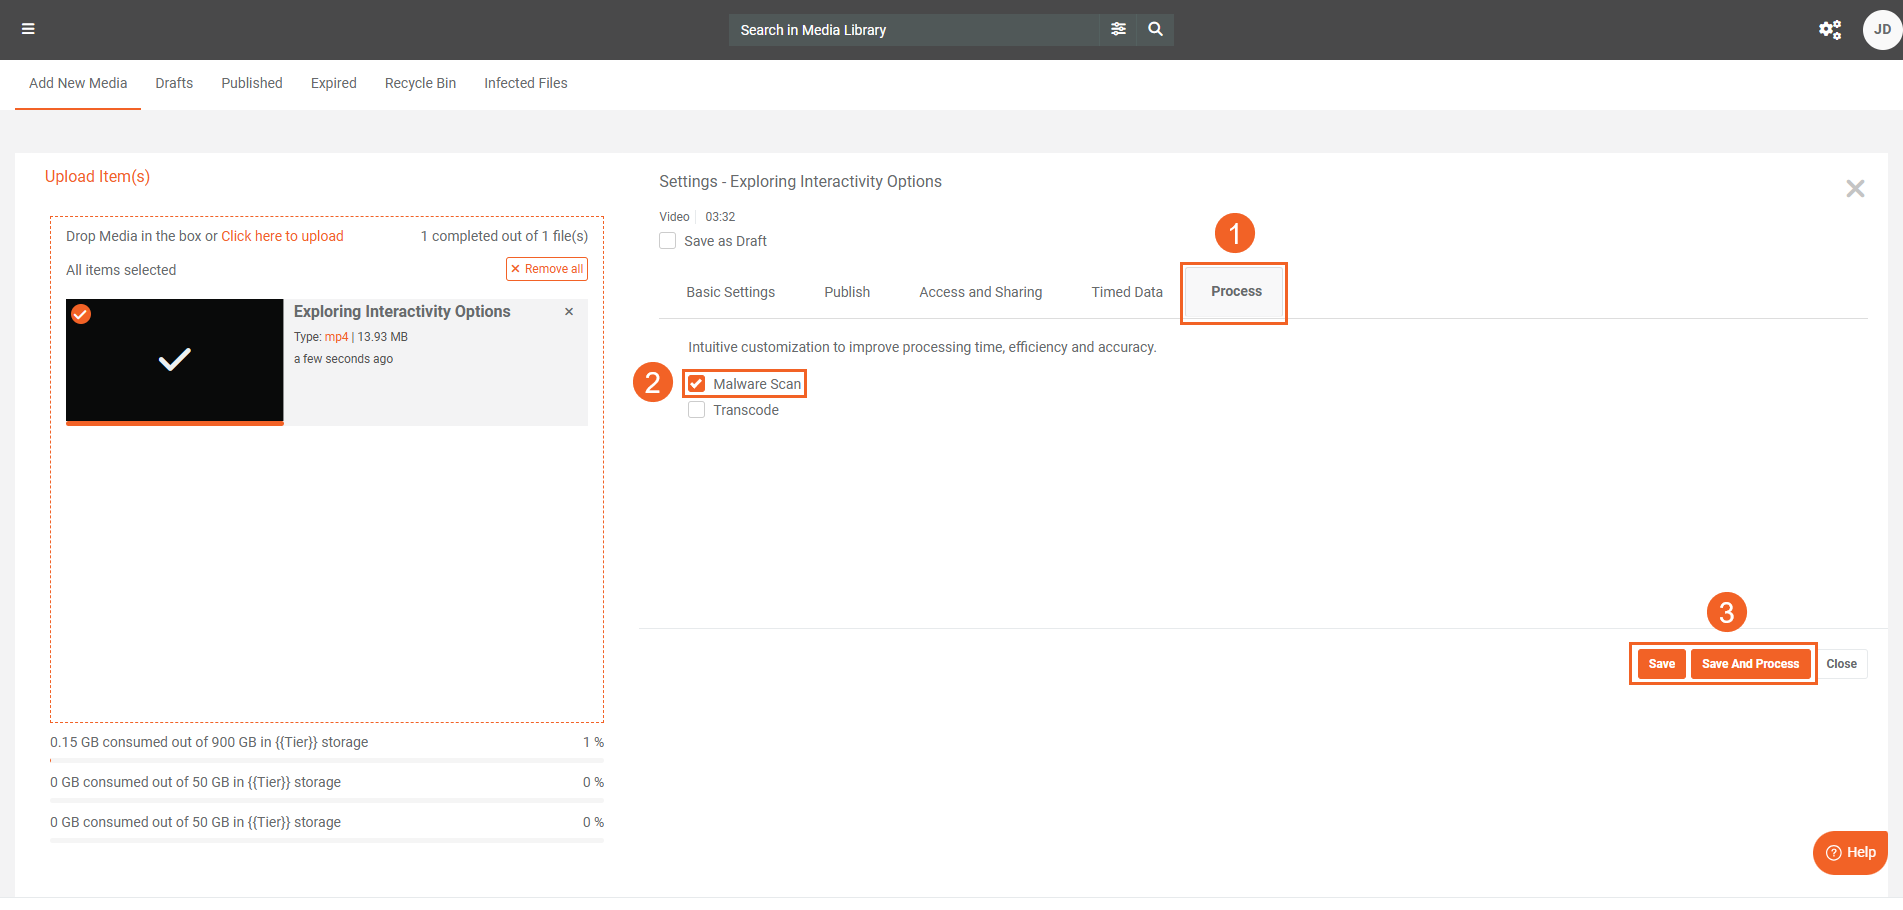
- When Custom Upload is enabled, EVCM users get access to the Process Tab in their Media Settings, where they can select options to process the files during upload. DEMS users get Custom Settings Upload instead of the default Upload Evidence as an option to upload files.
- After the file upload is complete, perform the settings and then select Malware Scan on the Process tab. Before you can select other processing insights, you would need to have malware scan selected.
- Click Save or Save and Process to save your settings and initiate the processing.
- If the file is infected, it goes into the Infected Files section, if not, it is published on your Portal.
On-Demand Processing via Process Modal
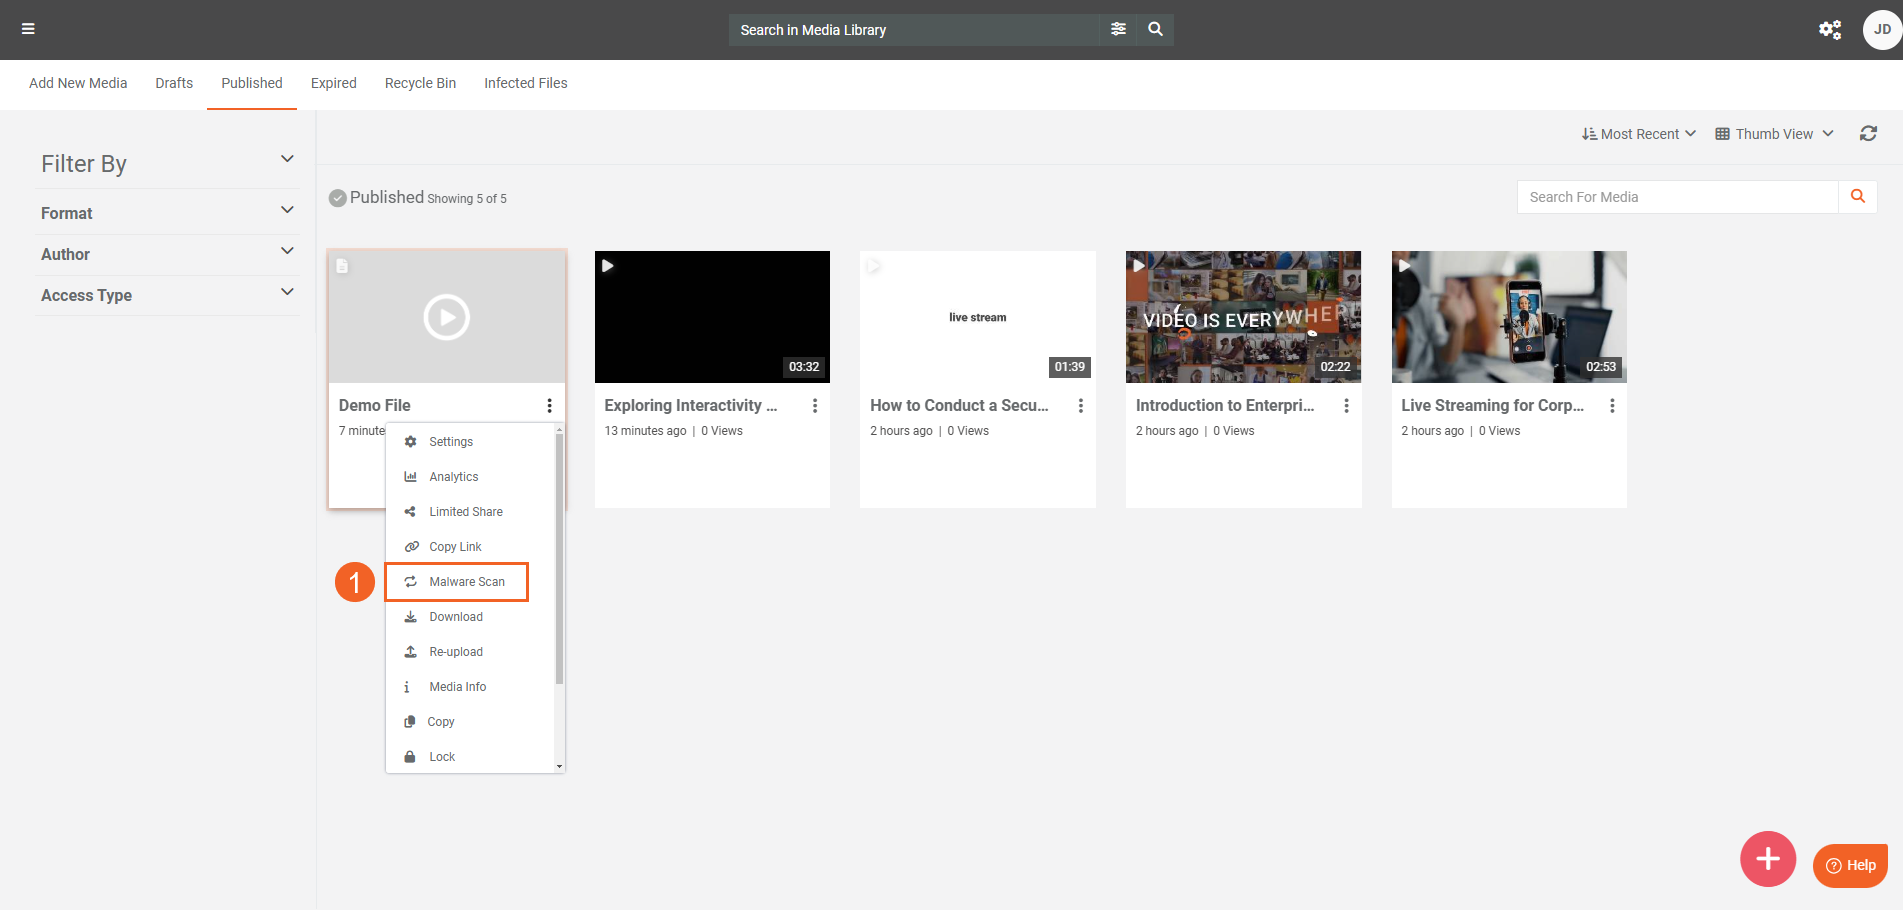
- Select Malware Scan from the overflow menu to perform on-demand processing via the Process modal.
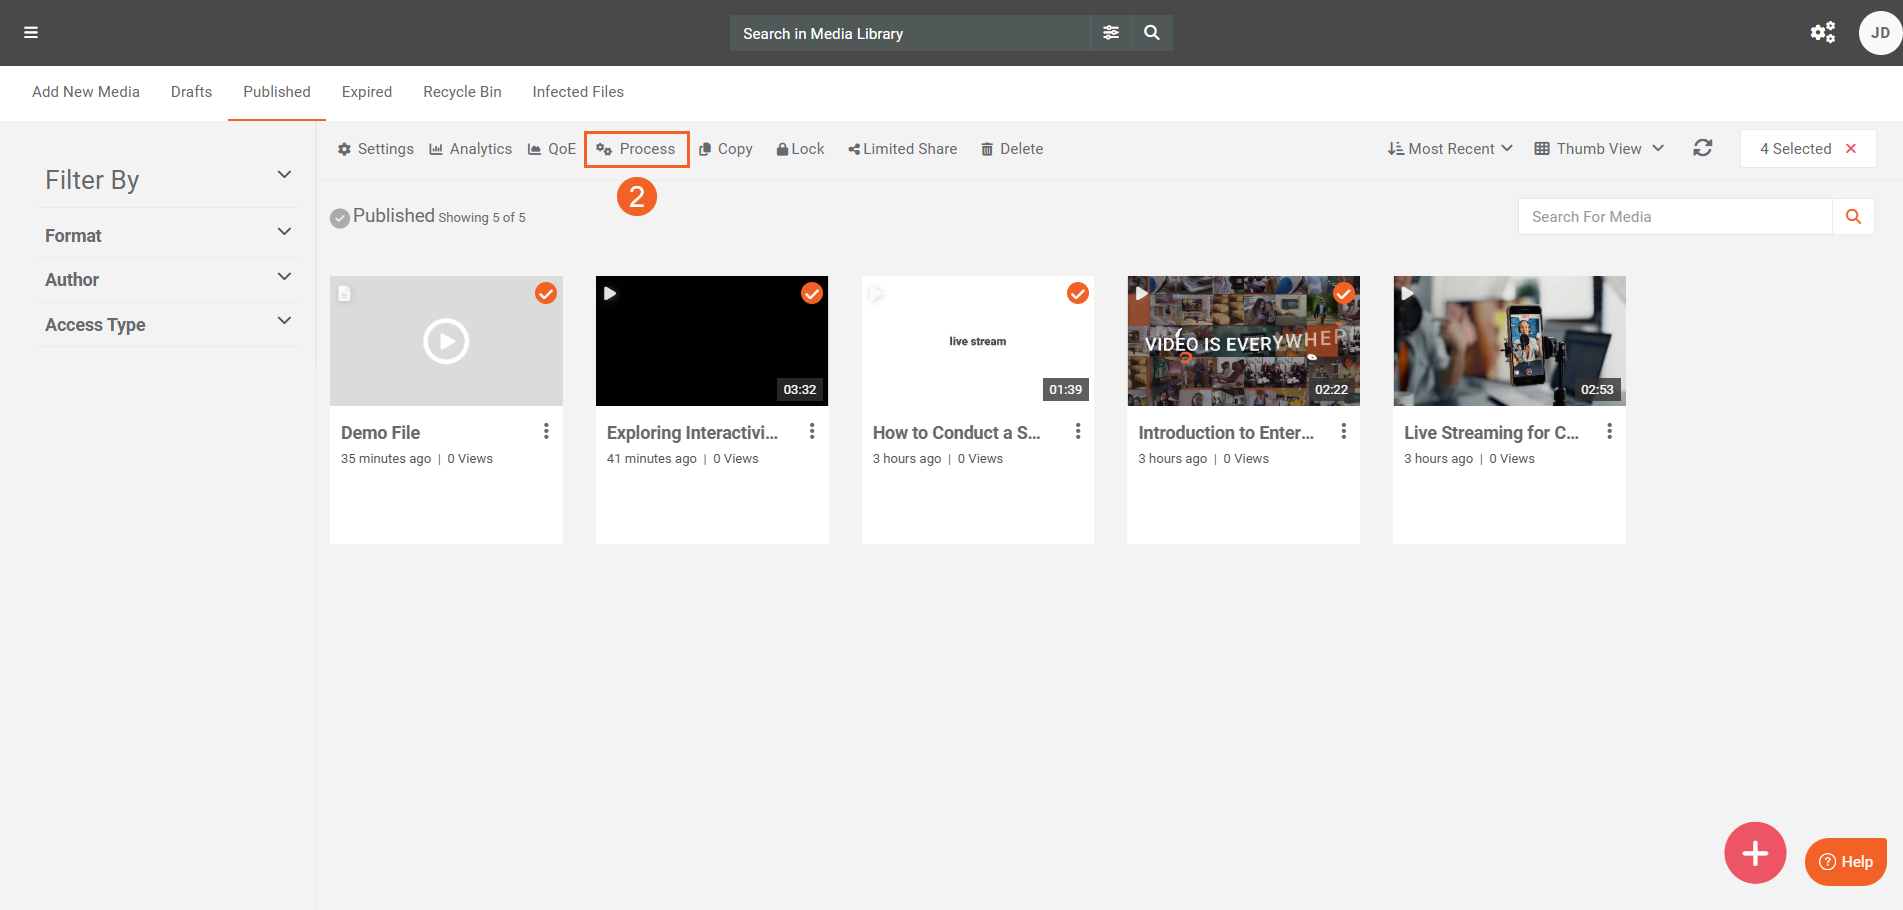
- You can also use the Process button on the header menu to perform Malware Scan for multiple files (in bulk) after you've selected them.
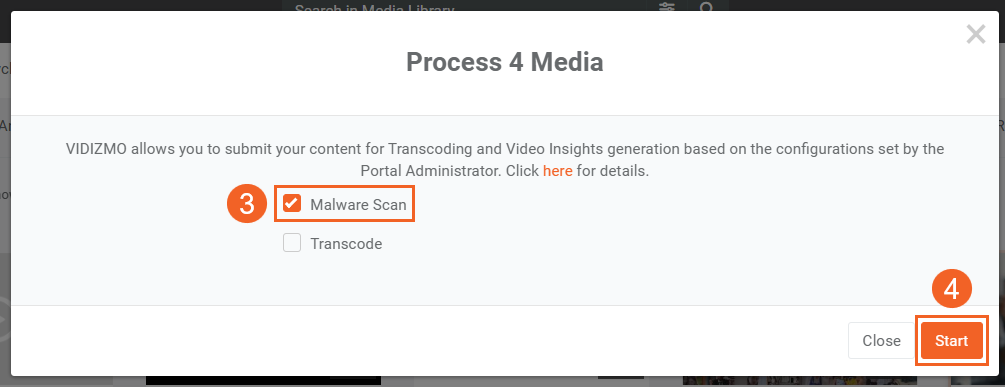
- Select Malware Scan on the Process Modal.
- Click Start to begin the scan for the selected files.
- If the file is found to be infected, then it will be sent to the Infected Files section of your Portal regardless of its prior state. For example, if it was published previously, then it will be sent to the.
Infected Files
The Infected Files section lists files identified as infected by the scanning provider. It also includes files for which the malware scanning process could not be completed. This section contains all critical files that require user attention and intervention.
Note: A notification email is sent to the user when an infected file is detected, or if a malware scan fails on a file in the Portal.
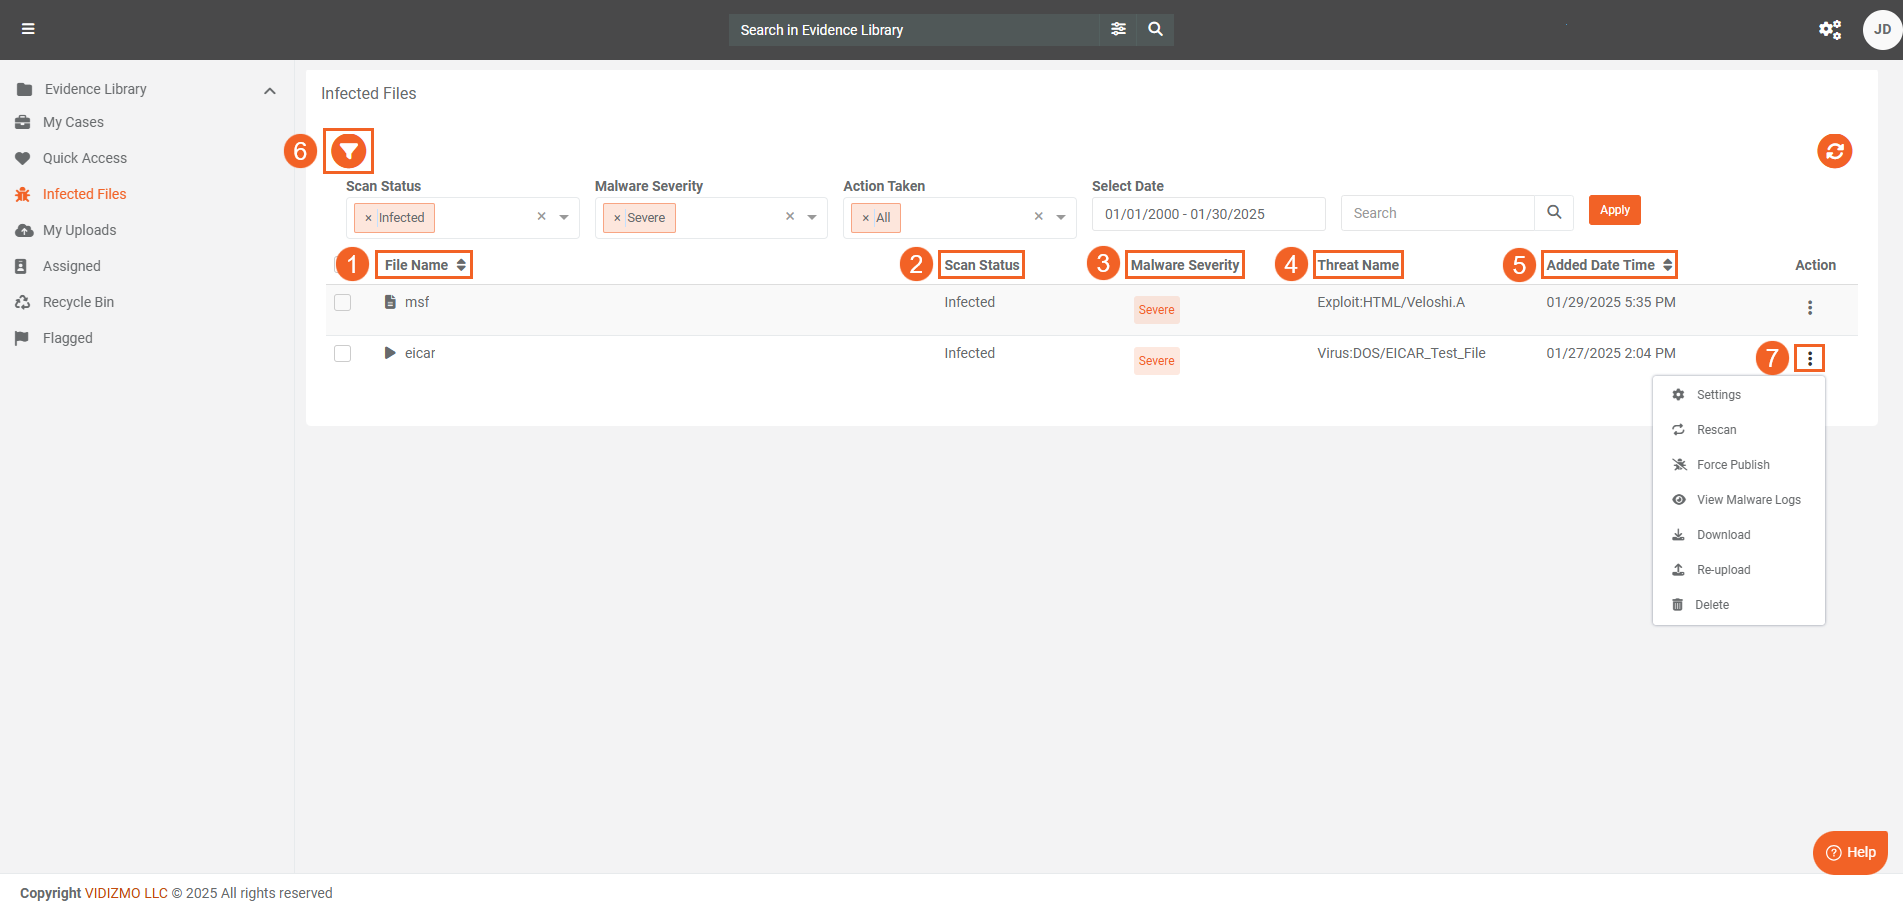
Let us take a look at how the information about the files is represented.
-
File name: The file name column displays the names of the affected or concerned files.
-
Scan Status: The scan status displays the reason of why a specific file is present on the infected files page. It indicates whether the file is present here because it is infected (indicated by
Infected) or if the scan failed on this specific file (indicated byFailed). -
Malware Severity: The Malware severity indicates the degree of the threat that a file has been infected with. The severity scale ranges from
None > Low > Medium > High > Severe -
Threat Name: The name of the detected threat on the infected file as identified by the scanning provider.
-
Added Date Time: The Added Date Time shows when the file was detected as infected or when the scanning procedure of the file failed.
-
The Filter Icon gives you options to search for or filter files on the page via their Scan Status, Malware Severity, Date, Actions Taken on them, or by typing in keywords in the search bar. These filters determine what files will be visible to you on this page.
-
Action Menu: Use the action menu to perform the following actions on the infected files or for files on which the scan failed.
- Settings: Configure or modify the file's settings.
- Rescan: Perform a malware scan from the configured scanning provider on the file again.
- Force Publish: Publish the file on your Portal regardless of its severity or status.
- View Malware Logs: Switch to the logs page to view the scan logs for the file.
- Download: Download the file regardless of its severity or status. This option is only available if downloading has been enabled for this file.
- Re-upload: Re-upload the file on your Portal. If automatic processing is enabled in the malware scan application, the re-uploaded file will undergo a scanning activity.
- Delete: Delete the file and send it to your Portal's Recycle Bin.
View Malware Logs
If you decide to view the malware logs for an infected or failed scan file, you will see a screen displaying the details of the malware scan results.
On this screen, you have options to download the logs, refresh the page to see the latest updates, or switch between different views to see more detailed information. Additionally, this page provides extra details about the affected files, including their format, status, or severity.
